HelloSpirngBoot
1 2 3 4 5 6 7 8 9 10 11 12 <parent > <groupId > org.springframework.boot</groupId > <artifactId > spring-boot-starter-parent</artifactId > <version > 2.3.4.RELEASE</version > </parent > <dependencies > <dependency > <groupId > org.springframework.boot</groupId > <artifactId > spring-boot-starter-web</artifactId > </dependency > </dependencies >
1
2
3
4
5
6
7
8
9
10
import org.springframework.boot.SpringApplication;import org.springframework.boot.autoconfigure.SpringBootApplication;@SpringBootApplication public class MainApplication {public static void main (String[] args) {
编写业务
RestController包含了Controller和ResponseBody ,表名这个类由spring接管,并且直接将内容作为返回体返回给浏览器,而不是进行视图解析
1
2
3
4
5
6
7
@RestController public class HelloController {@RequestMapping("/hello") public String handle01 () {return "Hello, Spring Boot 2!" ;
运行&测试
运行MainApplication类
浏览器输入http://localhost:8080/hello,将会输出Hello, Spring Boot 2!。
配置
maven工程的resource文件夹中创建application.properties文件。
更多配置信息
1 2 3 4 5 6 7 8 <build > <plugins > <plugin > <groupId > org.springframework.boot</groupId > <artifactId > spring-boot-maven-plugin</artifactId > </plugin > </plugins > </build >
在IDEA的Maven插件上点击运行 clean 、package,把helloworld工程项目的打包成jar包,
打包好的jar包被生成在helloworld工程项目的target文件夹内。
用cmd运行java -jar 文件名.jar,既可以运行helloworld工程项目。
将jar包直接在目标服务器执行即可。
自动配置 父项目做依赖管理 1 2 3 4 5 6 7 8 9 10 11 12 13 依赖管理<parent > <groupId > org.springframework.boot</groupId > <artifactId > spring-boot-starter-parent</artifactId > <version > 2.3.4.RELEASE</version > </parent > <parent > <groupId > org.springframework.boot</groupId > <artifactId > spring-boot-dependencies</artifactId > <version > 2.3.4.RELEASE</version > </parent >
开发导入starter场景启动器
见到很多 spring-boot-starter-* : *就某种场景
只要引入starter,这个场景的所有常规需要的依赖我们都自动引入
更多SpringBoot所有支持的场景 见到的 *-spring-boot-starter: 第三方为我们提供的简化开发的场景启动器。
1 2 3 4 5 6 7 所有场景启动器最底层的依赖<dependency > <groupId > org.springframework.boot</groupId > <artifactId > spring-boot-starter</artifactId > <version > 2.3.4.RELEASE</version > <scope > compile</scope > </dependency >
无需关注版本号,自动版本仲裁
引入依赖默认都可以不写版本
引入非版本仲裁的jar,要写版本号。
可以修改默认版本号
查看spring-boot-dependencies里面规定当前依赖的版本 用的 key。
在当前项目里面重写配置,如下面的代码。
1 2 3 <properties > <mysql.version > 5.1.43</mysql.version > </properties >
自动配置特性
1 2 3 4 5 6 <dependency > <groupId > org.springframework.boot</groupId > <artifactId > spring-boot-starter-tomcat</artifactId > <version > 2.3.4.RELEASE</version > <scope > compile</scope > </dependency >
自动配好SpringMVC
引入SpringMVC全套组件
自动配好SpringMVC常用组件(功能)
自动配好Web常见功能,如:字符编码问题
SpringBoot帮我们配置好了所有web开发的常见场景
1 2 3 4 5 6 7 8 9 10 public static void main (String[] args) {ConfigurableApplicationContext run = SpringApplication.run(MainApplication.class, args);for (String name : names) {
默认的包结构
主程序所在包及其下面的所有子包里面的组件都会被默认扫描进来
无需以前的包扫描配置
想要改变扫描路径
@SpringBootApplication(scanBasePackages=”com.lun”)
@ComponentScan 指定扫描路径
1 2 3 4 5 @SpringBootApplication @SpringBootConfiguration @EnableAutoConfiguration @ComponentScan("com.lun")
各种配置拥有默认值
默认配置最终都是映射到某个类上,如:MultipartProperties
配置文件的值最终会绑定每个类上,这个类会在容器中创建对象
按需加载所有自动配置项
非常多的starter
引入了哪些场景这个场景的自动配置才会开启
SpringBoot所有的自动配置功能都在 spring-boot-autoconfigure 包里面
底层注解 @Configuration
1 2 3 4 5 6 7 8 9 10 11 12 13 14 15 16 17 18 19 20 21 22 23 24 25 26 27 @Configuration(proxyBeanMethods = false) public class MyConfig {@Bean public User user01 () {User zhangsan = new User ("zhangsan" , 18 );return zhangsan;@Bean("tom") public Pet tomcatPet () {return new Pet ("tomcat" );
@Configuration测试代码如下:
1 2 3 4 5 6 7 8 9 10 11 12 13 14 15 16 17 18 19 20 21 22 23 24 25 26 27 28 29 30 31 32 33 34 35 36 @SpringBootConfiguration @EnableAutoConfiguration @ComponentScan("com.atguigu.boot") public class MainApplication {public static void main (String[] args) {ConfigurableApplicationContext run = SpringApplication.run(MainApplication.class, args);for (String name : names) {Pet tom01 = run.getBean("tom" , Pet.class);Pet tom02 = run.getBean("tom" , Pet.class);"组件:" +(tom01 == tom02));MyConfig bean = run.getBean(MyConfig.class);User user = bean.user01();User user1 = bean.user01();User user01 = run.getBean("user01" , User.class);Pet tom = run.getBean("tom" , Pet.class);"用户的宠物:" +(user01.getPet() == tom));
最佳实战
配置 类组件之间无依赖关系 用Lite模式加速容器启动过程,减少判断
配置 类组件之间有依赖关系 ,方法会被调用得到之前单实例组件,用Full模式(默认)
lite 英 [laɪt] 美 [laɪt]
@Import
@Bean、@Component、@Controller、@Service、@Repository,它们是Spring的基本标签,在Spring Boot中并未改变它们原来的功能。
@Import({User.class, DBHelper.class})给容器中自动创建出这两个类型的组件 、默认组件的名字就是全类名
1 2 3 4 @Import({User.class, DBHelper.class}) @Configuration(proxyBeanMethods = false) public class MyConfig {
测试类:
1 2 3 4 5 6 7 8 9 10 11 12 13 14 ConfigurableApplicationContext run = SpringApplication.run(MainApplication.class, args);for (String s : beanNamesForType) {DBHelper bean1 = run.getBean(DBHelper.class);
@Conditional 条件装配:满足Conditional指定的条件,则进行组件注入
用@ConditionalOnMissingBean举例说明
1 2 3 4 5 6 7 8 9 10 11 12 13 14 15 16 17 18 19 20 21 22 23 24 25 26 27 28 29 30 31 32 33 34 35 36 37 @Configuration(proxyBeanMethods = false) @ConditionalOnMissingBean(name = "tom") public class MyConfig {@Bean public User user01 () {User zhangsan = new User ("zhangsan" , 18 );return zhangsan;@Bean("tom22") public Pet tomcatPet () {return new Pet ("tomcat" );public static void main (String[] args) {ConfigurableApplicationContext run = SpringApplication.run(MainApplication.class, args);for (String name : names) {boolean tom = run.containsBean("tom" );"容器中Tom组件:" +tom);boolean user01 = run.containsBean("user01" );"容器中user01组件:" +user01);boolean tom22 = run.containsBean("tom22" );"容器中tom22组件:" +tom22);
@ImportResource 比如,公司使用bean.xml文件生成配置bean,然而你为了省事,想继续复用bean.xml,@ImportResource粉墨登场。
bean.xml:
1 2 3 4 5 6 7 8 9 10 11 12 <?xml version="1.0" encoding="UTF-8" ?> <beans ... "> <bean id ="haha" class ="com.lun.boot.bean.User" > <property name ="name" value ="zhangsan" > </property > <property name ="age" value ="18" > </property > </bean > <bean id ="hehe" class ="com.lun.boot.bean.Pet" > <property name ="name" value ="tomcat" > </property > </bean > </beans >
使用方法:
1 2 3 4 @ImportResource("classpath:beans.xml") public class MyConfig {
测试类:
1 2 3 4 5 6 7 8 9 public static void main (String[] args) {ConfigurableApplicationContext run = SpringApplication.run(MainApplication.class, args);boolean haha = run.containsBean("haha" );boolean hehe = run.containsBean("hehe" );"haha:" +haha);"hehe:" +hehe);
@ConfigurationProperties配置绑定 如何使用Java读取到properties文件中的内容,并且把它封装到JavaBean中,以供随时使用
传统方法:
1 2 3 4 5 6 7 8 9 10 11 12 13 public class getProperties {public static void main (String[] args) throws FileNotFoundException, IOException {Properties pps = new Properties ();new FileInputStream ("a.properties" ));Enumeration enum1 = pps.propertyNames();while (enum1.hasMoreElements()) {String strKey = (String) enum1.nextElement();String strValue = pps.getProperty(strKey);"=" + strValue);
Spring Boot一种配置配置绑定:
@ConfigurationProperties + @Component
假设有配置文件application.properties
1 2 mycar.brand =BYD mycar.price =100000
只有在容器中的组件,才会拥有SpringBoot提供的强大功能
1 2 3 4 5 @Component @ConfigurationProperties(prefix = "mycar") public class Car {
Spring Boot另一种配置配置绑定:
@EnableConfigurationProperties + @ConfigurationProperties
开启Car配置绑定功能
把这个Car这个组件自动注册到容器中
1 2 3 4 @EnableConfigurationProperties(Car.class) public class MyConfig {
1 2 3 4 @ConfigurationProperties(prefix = "mycar") public class Car {
@SpringBootApplication
1 2 3 @SpringBootConfiguration @EnableAutoConfiguration @ComponentScan
@SpringBootConfiguration 继承自Configuration注解,两者功能一致,标明当前类是配置类
@ComponentScan 扫描注解所在的配置类包及其子包的列
@EnableAutoConfiguration
1 2 @AutoConfigurationPackage @Import(AutoConfigurationImportSelector.class)
@AutoConfigurationPackage 1 @Import(AutoConfigurationPackages.Registrar.class)
注解内通过AutoConfigurationPackages.Registrar,
将被@SpringBootApplication标记的类所在包及其子包下的所有组件扫描导入到spring容器中
@Import(Selector)
利用getAutoConfigurationEntry(annotationMetadata);给容器中批量导入一些组件
调用List<String> configurations = getCandidateConfigurations(annotationMetadata, attributes)获取到所有需要导入到容器中的配置类
利用工厂加载 Map<String, List<String>> loadSpringFactories(@Nullable ClassLoader classLoader);得到所有的组件
从META-INF/spring.factories位置来加载一个文件。
虽然我们127个场景的所有自动配置启动的时候默认全部加载,但是xxxxAutoConfiguration按照条件装配规则(@Conditional),最终会按需配置。
以DispatcherServletAutoConfiguration的内部类DispatcherServletConfiguration为例子:
1 2 3 4 5 6 7 8 9 @Bean @ConditionalOnBean(MultipartResolver.class) @ConditionalOnMissingBean(name = DispatcherServlet.MULTIPART_RESOLVER_BEAN_NAME) public MultipartResolver multipartResolver (MultipartResolver resolver) {return resolver;
SpringBoot默认会在底层配好所有的组件,但是如果用户自己配置了以用户的优先 。
总结
SpringBoot先加载所有的自动配置类 xxxxxAutoConfiguration
每个自动配置类按照条件进行生效,默认都会绑定配置文件指定的值。(xxxxProperties里面读取,xxxProperties和配置文件进行了绑定)
生效的配置类就会给容器中装配很多组件
只要容器中有这些组件,相当于这些功能就有了
定制化配置
用户直接自己@Bean替换底层的组件
用户去看这个组件是获取的配置文件什么值就去修改。
xxxxxAutoConfiguration —> 组件 —> xxxxProperties里面拿值 —-> application.properties
SpringBoot应用如何编写
引入场景依赖
查看自动配置了哪些(选做)
自己分析,引入场景对应的自动配置一般都生效了
配置文件中debug=true开启自动配置报告。
Negative(不生效)
Positive(生效)
是否需要修改
参照文档修改配置项
官方文档 自己分析。xxxxProperties绑定了配置文件的哪些。
自定义加入或者替换组件
自定义器 XXXXXCustomizer;
……
yaml的用法 同以前的properties用法
YAML 是 “YAML Ain’t Markup Language”(YAML 不是一种标记语言)的递归缩写。在开发的这种语言时,YAML 的意思其实是:”Yet Another Markup Language”(仍是一种标记语言)。
非常适合用来做以数据为中心的配置文件 。
基本语法
key: value;kv之间有空格
大小写敏感
使用缩进表示层级关系
缩进不允许使用tab,只允许空格
缩进的空格数不重要,只要相同层级的元素左对齐即可
‘#’表示注释
字符串无需加引号,如果要加,单引号’’、双引号””表示字符串内容会被 转义、不转义
数据类型
字面量:单个的、不可再分的值。date、boolean、string、number、null
对象:键值对的集合。map、hash、set、object
1 2 3 4 5 6 7 8 9 10 k: {k1:v1 ,k2:v2 ,k3:v3 }k: k1: v1 k2: v2 k3: v3
数组:一组按次序排列的值。array、list、queue
1 2 3 4 5 6 7 8 9 10 k: [v1 ,v2 ,v3 ]k: - v1 - v2 - v3
实例 1 2 3 4 5 6 7 8 9 10 11 12 13 14 15 16 17 18 19 @Data public class Person {private String userName;private Boolean boss;private Date birth;private Integer age;private Pet pet;private String[] interests;private List<String> animal;private Map<String, Object> score;private Set<Double> salarys;private Map<String, List<Pet>> allPets;@Data public class Pet {private String name;private Double weight;
用yaml表示以上对象
1 2 3 4 5 6 7 8 9 10 11 12 13 14 15 16 17 18 19 20 21 22 23 24 25 person: userName: zhangsan boss: false birth: 2019 /12/12 20 :12:33 age: 18 pet: name: tomcat weight: 23.4 interests: [篮球 ,游泳 ]animal: - jerry - mario score: english: first: 30 second: 40 third: 50 math: [131 ,140 ,148 ]chinese: {first: 128 ,second: 136 }salarys: [3999 ,4999.98 ,5999.99 ]allPets: sick: - {name: tom }- {name: jerry ,weight: 47 }health: [{name: mario ,weight: 47 }]
自定义的类和配置文件绑定一般没有提示。若要提示,添加如下依赖:
1 2 3 4 5 6 7 8 9 10 11 12 13 14 15 16 17 18 19 20 21 22 23 <dependency > <groupId > org.springframework.boot</groupId > <artifactId > spring-boot-configuration-processor</artifactId > <optional > true</optional > </dependency > <build > <plugins > <plugin > <groupId > org.springframework.boot</groupId > <artifactId > spring-boot-maven-plugin</artifactId > <configuration > <excludes > <exclude > <groupId > org.springframework.boot</groupId > <artifactId > spring-boot-configuration-processor</artifactId > </exclude > </excludes > </configuration > </plugin > </plugins > </build >
Web开发 静态资源规则与定制化 静态资源目录 只要静态资源放在类路径下: called /static (or /public or /resources or /META-INF/resources
访问 : 当前项目根路径/ + 静态资源名
原理: 静态映射/**。
请求进来,先去找Controller看能不能处理。不能处理的所有请求又都交给静态资源处理器。静态资源也找不到则响应404页面。
也可以改变默认的静态资源路径,/static,/public,/resources, /META-INF/resources失效
1 2 resources: static-locations: [classpath:/haha/ ]
静态资源访问前缀 1 2 3 spring: mvc: static-path-pattern: /res/**
当前项目 + static-path-pattern + 静态资源名 = 静态资源文件夹下找
webjar 可用jar方式添加css,js等资源文件,
https://www.webjars.org/
例如,添加jquery
1 2 3 4 5 <dependency > <groupId > org.webjars</groupId > <artifactId > jquery</artifactId > <version > 3.5.1</version > </dependency >
访问地址:http://localhost:8080/webjars/jquery/3.5.1/jquery.js 后面地址要按照依赖里面的包路径。
Rest映射及源码解析 请求映射
Rest原理(表单提交要使用REST的时候)
表单提交会带上\_method=PUT
请求过来被 HiddenHttpMethodFilter拦截
请求是否正常,并且是POST
获取到\_method的值。
兼容以下请求;PUT .DELETE .PATCH
原生request(post),包装模式requesWrapper重写了getMethod方法,返回的是传入的值。 过滤器链放行的时候用wrapper。以后的方法调用getMethod是调用requesWrapper的。
Rest使用客户端工具。
如PostMan可直接发送put、delete等方式请求。
请求映射原理
DispatcherServlet重写了原生的Servlet
SpringMVC功能分析都从 org.springframework.web.servlet.DispatcherServlet -> doDispatch()
1 2 3 4 5 6 7 8 9 10 11 12 13 14 15 16 17 18 19 20 21 protected void doDispatch (HttpServletRequest request, HttpServletResponse response) throws Exception {HttpServletRequest processedRequest = request;HandlerExecutionChain mappedHandler = null ;boolean multipartRequestParsed = false ;WebAsyncManager asyncManager = WebAsyncUtils.getAsyncManager(request);try {ModelAndView mv = null ;Exception dispatchException = null ;try {
getHandler()方法如下:
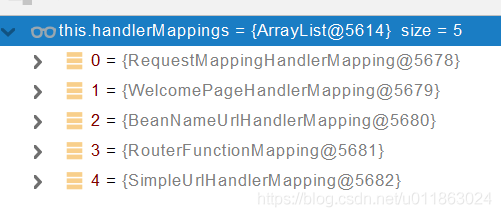
1 2 3 4 5 6 7 8 9 10 11 12 @Nullable protected HandlerExecutionChain getHandler (HttpServletRequest request) throws Exception {if (this .handlerMappings != null ) {for (HandlerMapping mapping : this .handlerMappings) {HandlerExecutionChain handler = mapping.getHandler(request);if (handler != null ) {return handler;return null ;
this.handlerMappings在Debug模式下展现的内容:
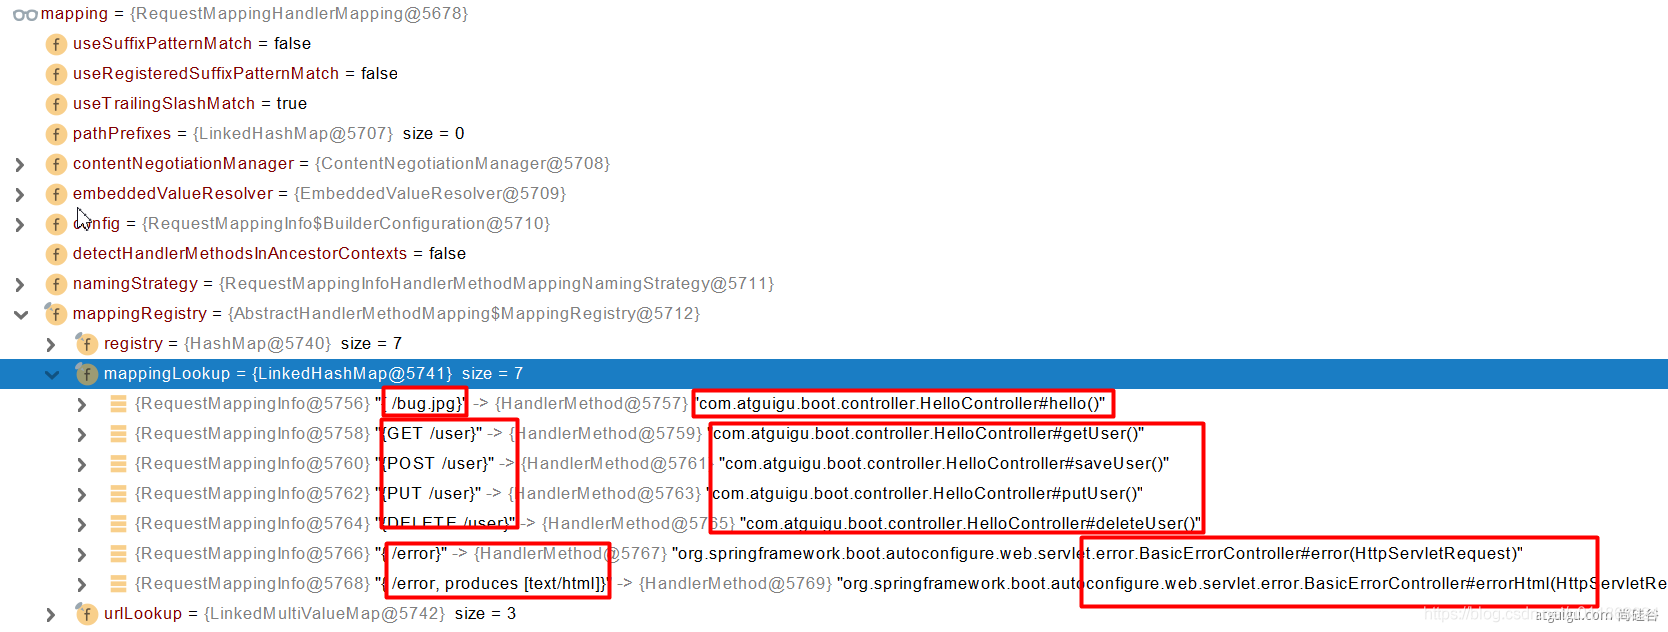
@RequestMapping 和handler的映射规则。
所有的请求映射都在HandlerMapping中:
SpringBoot自动配置欢迎页的 WelcomePageHandlerMapping 。访问 /能访问到index.html;
SpringBoot自动配置了默认 的 RequestMappingHandlerMapping
请求进来,挨个尝试所有的HandlerMapping看是否有请求信息。
如果有就找到这个请求对应的handler
如果没有就是下一个 HandlerMapping
我们需要一些自定义的映射处理,我们也可以自己给容器中放HandlerMapping 。自定义 HandlerMapping
请求处理-常用参数注解使用 注解:
@PathVariable 路径变量@RequestHeader 获取请求头@RequestParam 获取请求参数(指问号后的参数,url?a=1&b=2)@CookieValue 获取Cookie值@RequestAttribute 获取request域属性@RequestBody 获取请求体[POST]@MatrixVariable 矩阵变量@ModelAttribute
1 2 3 4 5 6 7 8 9 10 11 12 13 14 15 16 17 18 19 20 21 22 23 24 25 26 27 28 29 30 31 32 33 34 35 36 37 38 39 40 @RestController public class ParameterTestController {@GetMapping("/car/{id}/owner/{username}") public Map<String,Object> getCar (@PathVariable("id") Integer id, @PathVariable("username") String name, @PathVariable Map<String,String> pv, @RequestHeader("User-Agent") String userAgent, @RequestHeader Map<String,String> header, @RequestParam("age") Integer age, @RequestParam("inters") List<String> inters, @RequestParam Map<String,String> params, @CookieValue("_ga") String _ga, @CookieValue("_ga") Cookie cookie) {new HashMap <>();"age" ,age);"inters" ,inters);"params" ,params);"_ga" ,_ga);"===>" +cookie.getValue());return map;@PostMapping("/save") public Map postMethod (@RequestBody String content) {new HashMap <>();"content" ,content);return map;
MatrixVariable与UrlPathHelper
语法: 请求路径:/cars/sell;low=34;brand=byd,audi,yd
SpringBoot默认是禁用了矩阵变量的功能
手动开启:原理。对于路径的处理。UrlPathHelper的removeSemicolonContent设置为false,让其支持矩阵变量的。
矩阵变量必须 有url路径变量才能被解析
手动开启矩阵变量 :
1 2 3 4 5 6 7 8 9 10 11 @Configuration(proxyBeanMethods = false) public class WebConfig implements WebMvcConfigurer {@Override public void configurePathMatch (PathMatchConfigurer configurer) {UrlPathHelper urlPathHelper = new UrlPathHelper ();false );
创建返回WebMvcConfigurerBean:
1 2 3 4 5 6 7 8 9 10 11 12 13 14 15 @Configuration(proxyBeanMethods = false) public class WebConfig {@Bean public WebMvcConfigurer webMvcConfigurer () {return new WebMvcConfigurer () {@Override public void configurePathMatch (PathMatchConfigurer configurer) {UrlPathHelper urlPathHelper = new UrlPathHelper ();false );
@MatrixVariable的用例
1 2 3 4 5 6 7 8 9 10 11 12 13 14 15 16 17 18 19 20 21 22 23 24 25 26 27 28 29 30 @RestController public class ParameterTestController {@GetMapping("/cars/{path}") public Map carsSell (@MatrixVariable("low") Integer low, @MatrixVariable("brand") List<String> brand, @PathVariable("path") String path) {new HashMap <>();"low" ,low);"brand" ,brand);"path" ,path);return map;@GetMapping("/boss/{bossId}/{empId}") public Map boss (@MatrixVariable(value = "age",pathVar = "bossId") Integer bossAge, @MatrixVariable(value = "age",pathVar = "empId") Integer empAge) {new HashMap <>();"bossAge" ,bossAge);"empAge" ,empAge);return map;
拦截器-登录检查与静态资源放行
编写一个拦截器实现HandlerInterceptor接口
拦截器注册到容器中(实现WebMvcConfigurer的addInterceptors())
指定拦截规则(注意,如果是拦截所有,静态资源也会被拦截】
编写一个实现HandlerInterceptor接口的拦截器:
1 2 3 4 5 6 7 8 9 10 11 12 13 14 15 16 17 18 19 20 21 22 23 24 25 26 27 28 29 30 31 32 33 34 35 36 37 38 39 40 41 42 43 44 45 @Slf4j public class LoginInterceptor implements HandlerInterceptor {@Override public boolean preHandle (HttpServletRequest request, HttpServletResponse response, Object handler) throws Exception {String requestURI = request.getRequestURI();"preHandle拦截的请求路径是{}" ,requestURI);HttpSession session = request.getSession();Object loginUser = session.getAttribute("loginUser" );if (loginUser != null ){return true ;"msg" ,"请先登录" );"/" ).forward(request,response);return false ;@Override public void postHandle (HttpServletRequest request, HttpServletResponse response, Object handler, ModelAndView modelAndView) throws Exception {"postHandle执行{}" ,modelAndView);@Override public void afterCompletion (HttpServletRequest request, HttpServletResponse response, Object handler, Exception ex) throws Exception {"afterCompletion执行异常{}" ,ex);
1 2 3 4 5 6 7 8 9 @Configuration public class AdminWebConfig implements WebMvcConfigurer {@Override public void addInterceptors (InterceptorRegistry registry) {new LoginInterceptor ())"/**" ) "/" ,"/login" ,"/css/**" ,"/fonts/**" ,"/images/**" ,"/js/**" ,"/aa/**" );
文件上传-单文件与多文件上传的使用
页面代码/static/form/form_layouts.html
1 2 3 4 5 6 7 8 9 10 11 12 13 14 15 16 17 18 19 20 21 22 23 24 25 26 27 28 <form role ="form" th:action ="@{/upload}" method ="post" enctype ="multipart/form-data" > <div class ="form-group" > <label for ="exampleInputEmail1" > 邮箱</label > <input type ="email" name ="email" class ="form-control" id ="exampleInputEmail1" placeholder ="Enter email" > </div > <div class ="form-group" > <label for ="exampleInputPassword1" > 名字</label > <input type ="text" name ="username" class ="form-control" id ="exampleInputPassword1" placeholder ="Password" > </div > <div class ="form-group" > <label for ="exampleInputFile" > 头像</label > <input type ="file" name ="headerImg" id ="exampleInputFile" > </div > <div class ="form-group" > <label for ="exampleInputFile" > 生活照</label > <input type ="file" name ="photos" multiple > </div > <div class ="checkbox" > <label > <input type ="checkbox" > Check me out</label > </div > <button type ="submit" class ="btn btn-primary" > 提交</button > </form >
1 2 3 4 5 6 7 8 9 10 11 12 13 14 15 16 17 18 19 20 21 22 23 24 25 26 27 28 29 30 31 32 33 34 35 36 37 @Slf4j @Controller public class FormTestController {@GetMapping("/form_layouts") public String form_layouts () {return "form/form_layouts" ;@PostMapping("/upload") public String upload (@RequestParam("email") String email, @RequestParam("username") String username, @RequestPart("headerImg") MultipartFile headerImg, @RequestPart("photos") MultipartFile[] photos) throws IOException {"上传的信息:email={},username={},headerImg={},photos={}" ,if (!headerImg.isEmpty()){String originalFilename = headerImg.getOriginalFilename();new File ("H:\\cache\\" +originalFilename));if (photos.length > 0 ){for (MultipartFile photo : photos) {if (!photo.isEmpty()){String originalFilename = photo.getOriginalFilename();new File ("H:\\cache\\" +originalFilename));return "main" ;
文件上传相关的配置类:
org.springframework.boot.autoconfigure.web.servlet.MultipartAutoConfigurationorg.springframework.boot.autoconfigure.web.servlet.MultipartProperties
文件大小相关配置项:
1 2 spring.servlet.multipart.max-file-size =10MB spring.servlet.multipart.max-request-size =100MB
错误处理-SpringBoot默认错误处理机制 Spring Boot官方文档 - Error Handling
默认规则 :
1 2 3 4 5 6 7 { "timestamp" : "2020-11-22T05:53:28.416+00:00" , "status" : 404 , "error" : "Not Found" , "message" : "No message available" , "path" : "/asadada" }
原生组件注入 官方文档 - Servlets, Filters, and listeners
使用原生的注解 1 2 3 4 5 6 7 8 @WebServlet(urlPatterns = "/my") public class MyServlet extends HttpServlet {@Override protected void doGet (HttpServletRequest req, HttpServletResponse resp) throws ServletException, IOException {"66666" );
1 2 3 4 5 6 7 8 9 10 11 12 13 14 15 16 17 18 19 @Slf4j @WebFilter(urlPatterns={"/css/*","/images/*"}) public class MyFilter implements Filter {@Override public void init (FilterConfig filterConfig) throws ServletException {"MyFilter初始化完成" );@Override public void doFilter (ServletRequest request, ServletResponse response, FilterChain chain) throws IOException, ServletException {"MyFilter工作" );@Override public void destroy () {"MyFilter销毁" );
1 2 3 4 5 6 7 8 9 10 11 12 13 14 15 @Slf4j @WebListener public class MyServletContextListener implements ServletContextListener {@Override public void contextInitialized (ServletContextEvent sce) {"MySwervletContextListener监听到项目初始化完成" );@Override public void contextDestroyed (ServletContextEvent sce) {"MySwervletContextListener监听到项目销毁" );
最后还要在主启动类添加注解@ServletComponentScan
1 2 3 4 5 6 7 8 @ServletComponentScan(basePackages = "com.lun") @SpringBootApplication(exclude = RedisAutoConfiguration.class) public class Boot05WebAdminApplication {public static void main (String[] args) {
Spring方式注入 ServletRegistrationBean, FilterRegistrationBean, and ServletListenerRegistrationBean
1 2 3 4 5 6 7 8 9 10 11 12 13 14 15 16 17 18 19 20 21 22 23 24 25 26 27 @Configuration(proxyBeanMethods = true) public class MyRegistConfig {@Bean public ServletRegistrationBean myServlet () {MyServlet myServlet = new MyServlet ();return new ServletRegistrationBean (myServlet,"/my" ,"/my02" );@Bean public FilterRegistrationBean myFilter () {MyFilter myFilter = new MyFilter ();FilterRegistrationBean filterRegistrationBean = new FilterRegistrationBean (myFilter);"/my" ,"/css/*" ));return filterRegistrationBean;@Bean public ServletListenerRegistrationBean myListener () {MySwervletContextListener mySwervletContextListener = new MySwervletContextListener ();return new ServletListenerRegistrationBean (mySwervletContextListener);
数据访问-数据库场景的自动配置分析与整合测试 导入JDBC场景 1 2 3 4 <dependency > <groupId > org.springframework.boot</groupId > <artifactId > spring-boot-starter-data-jdbc</artifactId > </dependency >
接着导入数据库驱动包(MySQL为例)。
1 2 3 4 5 6 7 8 9 10 11 12 13 14 15 16 17 18 <mysql.version > 8.0.22</mysql.version > <dependency > <groupId > mysql</groupId > <artifactId > mysql-connector-java</artifactId > </dependency > <properties > <java.version > 1.8</java.version > <mysql.version > 5.1.49</mysql.version > </properties >
相关数据源配置类
DataSourceAutoConfiguration : 数据源的自动配置。
修改数据源相关的配置:spring.datasource。
数据库连接池的配置,是自己容器中没有DataSource才自动配置的 。底层配置好的连接池是:HikariDataSource。
DataSourceTransactionManagerAutoConfiguration: 事务管理器的自动配置。
JdbcTemplateAutoConfiguration: JdbcTemplate的自动配置,可以来对数据库进行CRUD。
可以修改前缀为spring.jdbc的配置项来修改JdbcTemplate。
@Bean @Primary JdbcTemplate:Spring容器中有这个JdbcTemplate组件,使用@Autowired。
JndiDataSourceAutoConfiguration: JNDI的自动配置。
XADataSourceAutoConfiguration: 分布式事务相关的。
修改配置项 1 2 3 4 5 6 spring: datasource: url: jdbc:mysql://localhost:3306/db_account username: root password: 123456 driver-class-name: com.mysql.jdbc.Driver
单元测试数据源 1 2 3 4 5 6 7 8 9 10 11 12 13 14 15 16 17 18 19 20 import org.junit.jupiter.api.Test;import org.springframework.beans.factory.annotation.Autowired;import org.springframework.boot.test.context.SpringBootTest;import org.springframework.jdbc.core.JdbcTemplate;@SpringBootTest class Boot05WebAdminApplicationTests {@Autowired @Test void contextLoads () {Long aLong = jdbcTemplate.queryForObject("select count(*) from account_tbl" , Long.class);"记录总数:{}" ,aLong);
数据访问-自定义方式整合druid数据源 Druid官网
Druid是什么? 它是数据库连接池,它能够提供强大的监控和扩展功能。
官方文档 - Druid连接池介绍
Spring Boot整合第三方技术的两种方式:
自定义方式 添加依赖 :
1 2 3 4 5 <dependency > <groupId > com.alibaba</groupId > <artifactId > druid</artifactId > <version > 1.1.17</version > </dependency >
配置Druid数据源 :
1 2 3 4 5 6 7 8 9 10 11 12 13 14 15 @Configuration public class MyConfig {@Bean @ConfigurationProperties("spring.datasource") public DataSource dataSource () throws SQLException {DruidDataSource druidDataSource = new DruidDataSource ();return druidDataSource;
更多配置项
配置Druid的监控页功能 :
1 2 3 4 5 6 7 8 9 10 11 12 13 14 15 16 17 18 19 20 21 22 23 24 25 26 27 28 29 30 31 32 33 34 35 36 37 38 39 40 41 42 43 44 45 46 @Configuration public class MyConfig {@Bean @ConfigurationProperties("spring.datasource") public DataSource dataSource () throws SQLException {DruidDataSource druidDataSource = new DruidDataSource ();"stat,wall" );return druidDataSource;@Bean public ServletRegistrationBean statViewServlet () {StatViewServlet statViewServlet = new StatViewServlet ();new ServletRegistrationBean <>(statViewServlet, "/druid/*" );"loginUsername" ,"admin" );"loginPassword" ,"123456" );return registrationBean;@Bean public FilterRegistrationBean webStatFilter () {WebStatFilter webStatFilter = new WebStatFilter ();new FilterRegistrationBean <>(webStatFilter);"/*" ));"exclusions" ,"*.js,*.gif,*.jpg,*.png,*.css,*.ico,/druid/*" );return filterRegistrationBean;
starter整合方式 官方文档 - Druid Spring Boot Starter
引入依赖 :
1 2 3 4 5 <dependency > <groupId > com.alibaba</groupId > <artifactId > druid-spring-boot-starter</artifactId > <version > 1.1.17</version > </dependency >
分析自动配置 :
扩展配置项 spring.datasource.druid
自动配置类DruidDataSourceAutoConfigure
DruidSpringAopConfiguration.class, 监控SpringBean的;配置项:spring.datasource.druid.aop-patternsDruidStatViewServletConfiguration.class, 监控页的配置。spring.datasource.druid.stat-view-servlet默认开启。DruidWebStatFilterConfiguration.class,web监控配置。spring.datasource.druid.web-stat-filter默认开启。DruidFilterConfiguration.class所有Druid的filter的配置:
1 2 3 4 5 6 7 8 private static final String FILTER_STAT_PREFIX = "spring.datasource.druid.filter.stat" ;private static final String FILTER_CONFIG_PREFIX = "spring.datasource.druid.filter.config" ;private static final String FILTER_ENCODING_PREFIX = "spring.datasource.druid.filter.encoding" ;private static final String FILTER_SLF4J_PREFIX = "spring.datasource.druid.filter.slf4j" ;private static final String FILTER_LOG4J_PREFIX = "spring.datasource.druid.filter.log4j" ;private static final String FILTER_LOG4J2_PREFIX = "spring.datasource.druid.filter.log4j2" ;private static final String FILTER_COMMONS_LOG_PREFIX = "spring.datasource.druid.filter.commons-log" ;private static final String FILTER_WALL_PREFIX = "spring.datasource.druid.filter.wall" ;
配置示例 :
1 2 3 4 5 6 7 8 9 10 11 12 13 14 15 16 17 18 19 20 21 22 23 24 25 26 27 28 29 30 31 32 spring: datasource: url: jdbc:mysql://localhost:3306/db_account username: root password: 123456 driver-class-name: com.mysql.jdbc.Driver druid: aop-patterns: com.atguigu.admin.* filters: stat,wall stat-view-servlet: enabled: true login-username: admin login-password: admin resetEnable: false web-stat-filter: enabled: true urlPattern: /* exclusions: '*.js,*.gif,*.jpg,*.png,*.css,*.ico,/druid/*' filter: stat: slow-sql-millis: 1000 logSlowSql: true enabled: true wall: enabled: true config: drop-table-allow: false
数据访问-整合MyBatis-配置版 MyBatis的GitHub仓库
MyBatis官方
starter的命名方式 :
SpringBoot官方的Starter:spring-boot-starter-*
第三方的: -spring-boot-starter
引入依赖 :
1 2 3 4 5 <dependency > <groupId > org.mybatis.spring.boot</groupId > <artifactId > mybatis-spring-boot-starter</artifactId > <version > 2.1.4</version > </dependency >
配置模式 :
全局配置文件
SqlSessionFactory:自动配置好了
SqlSession:自动配置了SqlSessionTemplate 组合了SqlSession
@Import(AutoConfiguredMapperScannerRegistrar.class)
Mapper: 只要我们写的操作MyBatis的接口标准了@Mapper就会被自动扫描进来
1 2 3 4 5 6 7 8 9 10 @EnableConfigurationProperties(MybatisProperties.class) : MyBatis配置项绑定类。@AutoConfigureAfter({ DataSourceAutoConfiguration.class, MybatisLanguageDriverAutoConfiguration.class }) public class MybatisAutoConfiguration {@ConfigurationProperties(prefix = "mybatis") public class MybatisProperties {
配置文件 :
1 2 3 4 5 6 7 8 9 10 11 spring: datasource: username: root password: 1234 url: jdbc:mysql://localhost:3306/my driver-class-name: com.mysql.jdbc.Driver mybatis: config-location: classpath:mybatis/mybatis-config.xml mapper-locations: classpath:mybatis/*.xml
mybatis-config.xml :
1 2 3 4 5 6 7 8 <?xml version="1.0" encoding="UTF-8" ?> <!DOCTYPE configuration PUBLIC "-//mybatis.org//DTD Config 3.0//EN" "http://mybatis.org/dtd/mybatis-3-config.dtd" > <configuration > </configuration >
Mapper接口 :
1 2 3 4 5 6 7 8 9 10 <?xml version="1.0" encoding="UTF-8" ?> <!DOCTYPE mapper PUBLIC "-//mybatis.org//DTD Mapper 3.0//EN" "http://mybatis.org/dtd/mybatis-3-mapper.dtd" > <mapper namespace ="com.lun.boot.mapper.UserMapper" > <select id ="getUser" resultType ="com.lun.boot.bean.User" > </select > </mapper >
1 2 3 4 5 6 7 import com.lun.boot.bean.User;import org.apache.ibatis.annotations.Mapper;@Mapper public interface UserMapper {public User getUser (Integer id) ;
POJO :
1 2 3 4 5 6 public class User {private Integer id;private String name;
DB :
1 2 3 4 5 CREATE TABLE `user ` (int (11 ) NOT NULL AUTO_INCREMENT,varchar (45 ) DEFAULT NULL ,PRIMARY KEY (`id`)= InnoDB AUTO_INCREMENT= 3 DEFAULT CHARSET= utf8mb4;
Controller and Service :
1 2 3 4 5 6 7 8 9 10 11 12 13 14 @Controller public class UserController {@Autowired private UserService userService;@ResponseBody @GetMapping("/user/{id}") public User getUser (@PathVariable("id") Integer id) {return userService.getUser(id);
1 2 3 4 5 6 7 8 9 10 11 @Service public class UserService {@Autowired private UserMapper userMapper;public User getUser (Integer id) {return userMapper.getUser(id);
配置private Configuration configuration; 也就是配置mybatis.configuration相关的,就是相当于改mybatis全局配置文件中的值。(也就是说配置了mybatis.configuration,就不需配置mybatis全局配置文件了)
1 2 3 4 5 6 7 mybatis: mapper-locations: classpath:mybatis/mapper/*.xml configuration: map-underscore-to-camel-case: true
小结
导入MyBatis官方Starter。
编写Mapper接口,需@Mapper注解。
编写SQL映射文件并绑定Mapper接口。
在application.yaml中指定Mapper配置文件的所处位置,以及指定全局配置文件的信息 (建议:**配置在mybatis.configuration**)。
数据访问-整合Redis 添加依赖 :
1 2 3 4 5 6 7 8 9 10 <dependency > <groupId > org.springframework.boot</groupId > <artifactId > spring-boot-starter-data-redis</artifactId > </dependency > <dependency > <groupId > redis.clients</groupId > <artifactId > jedis</artifactId > </dependency >
RedisAutoConfiguration自动配置类,RedisProperties 属性类 –> spring.redis.xxx是对redis的配置。连接工厂LettuceConnectionConfiguration、JedisConnectionConfiguration是准备好的。
自动注入了RedisTemplate<Object, Object>,xxxTemplate。
自动注入了StringRedisTemplate,key,value都是String
底层只要我们使用StringRedisTemplate、RedisTemplate就可以操作Redis。
外网Redis环境搭建 :
阿里云按量付费Redis,其中选择经典网络 。
申请Redis的公网连接地址。
修改白名单,允许0.0.0.0/0访问。
相关Redis配置:
1 2 3 4 5 6 7 8 9 10 11 12 13 14 spring:6379 10 10 5
测试Redis连接:
1 2 3 4 5 6 7 8 9 10 11 12 13 14 15 16 17 18 19 20 21 22 23 @SpringBootTest public class Boot05WebAdminApplicationTests {@Autowired @Autowired @Test void testRedis () {"hello" ,"world" );String hello = operations.get("hello" );